
Tuesday, June 12, 2012


Wednesday, May 23, 2012
At-Home HIV Test
 I just read
an article today about a new HIV test that can be taken in your own home. This
product was endorsed by a group of people in the Food and Drug Administration. The
significant thing about this test is that it only takes twenty minutes and you
don’t need to take a trip to a clinic to get tested for HIV. This incredible
new HIV test was created in Bethlehem, Pennsylvania
by a company called Orasure. The new test has been accurate
ninety three percent of the time. This means that out of 50,000 people, 3,800
people have a chance of not getting accurate results. Although 3,800 people may
not get accurate results, this still means that 45,000 people will get accurate
results that they may have HIV.
In my
opinion, this new HIV test is incredible. First, it is cheap. Even though it is
not something you can buy from your local pharmacy yet, you can still buy it
from your doctor. The price is around twenty dollars. Next, it can save you
money because people don’t need to guzzle gas and go to a clinic to get an HIV
test. Also, it doesn’t take a long time to take this test. This test gives results in only twenty minutes. Lastly, it is a test that you don’t have to send
to a lab. All other at-home HIV tests have to be sent back to a lab to get
tested.
Article:
Picture:
Tuesday, May 8, 2012
Drugs for Humans Grown in Plant Cells

Today, I read an article about a new drug for humans that was approved by
the U.S. Federal Drug Administration. The cool thing about this new drug is
that it was genetically created into a plant cell. This is the first drug made
like this that was approved by the U.S. Federal Drug Administration. The drug
that was put into these plant cells is called Elelyso. Elelyso is a treatment
for a disorder called Gaucher disease. This disease is a lysosomes storage
disorder that can cause lung disease, easy bruising, and seizures. This amazing
drug was accepted on Wednesday June 2, 2012. Even though this idea of using
plant cells to make human enzymes isn’t the first, it shows that the FDA may
allow future “bio-pharmed treatments”.
I feel that by getting the trust of the FDA, scientists can create more
treatments using plant cells. By doing this, people will be able to receive treatments
for diseases and disorders much faster. This will save time and money for
treatments. Also, more and more drugs can be generated in plant cells and then
given to patients. This process will make treatments easier for doctors and
patients. Lastly, this gives another treatment option to patients.

Thursday, March 29, 2012
Plastic That Bleeds?

Recently, I read an article about a plastic created by Marek W. Urban. This is no ordinary plastic. In fact, it is a plastic that bleeds. When this special type of plastic is cut, it bleeds red just like a human being. Another thing it has in common with humans is that it can heal itself. It may seem impossible, but it’s not. The reason this type of plastic is able to do this is because it is made from water-based copolymers. When these copolymers are cut or cracked, their molecular link breaks. What Marek Urban did is that he changed this copolymer so that when it breaks, you can see the color of it change. This breakthrough occurred at the University of Southern Mississippi, but it was actually presented at the American Chemical Society’s national meeting in San Diego on Monday, March 26, 2012.
In my opinion, this new type of plastic is a wonderful invention. First, it is easy to apply. All you need to do it put a thin coat of the copolymer on any material. Next, it can fix anything. Many people have cracked cell phone screens and this new plastic can fill the cracks. This will make the cell phone screen look good as new. Also, it can improve safety. For instance, when there is a mechanical issue or something breaks in an airplane, the color will change and the problem will be visible. In addition, the copolymer works using any type of heat or light. Overall, this breakthrough is life changing for many people.
Tuesday, February 7, 2012
States of Matter Labs

 Next, our science class did a lab about carbon dioxide and fire. To make the carbon dioxide we mixed vinegar and baking soda together. This made the substance to fizz. The new substance we made was a chemical change. We took the beaker holding the carbon dioxide mixture and held it over a flaming candle. This caused the flame to go out. The reason this happened was because fire is not supported by carbon dioxide.
After that, we did a lab about marshmallows. Each person got one small marshmallow and one big marshmallow. The first thing we did was rip the small marshmallow in half. This was a physical change because the appearance of the marshmallow changed. Next, we put the big marshmallow over the Bunsen burner and burned them a little bit. This was a chemical change. The burned part of the marshmallow tasted bitter and burned. The rest of the marshmallow was sweet and fluffy.
 The last lab we did also showed many examples of physical and chemical changes. In the beginning of the lab we had to crush up sugar cubes. This was a physical change because the size of the sugar cubes changed. Then, we took the crushed sugar and mixed it in with a glass of water. This was also a physical change because the sugar just dissolved. The last part of this lab was burning the sugar. Because the sugar was being burned, it was a chemical change.
All of these labs showed many examples of physical and chemical changes. The skills I learned during these labs can help me in my life. For instance, I can use physical and chemical properties to describe different things.
Pictures:
Thursday, January 12, 2012
Seperating Mixtures
1. To begin, remove the toothpicks from the mixture with the spoon.
2. Next, remove the beans from the mixture using the spoon.
3. Then, take out the large marble with the spoon.
4. After that, using the magnet, remove the iron filings.
5. Also, place the filter sheet over the beaker and pour the mixture into the beaker. This will separate the sand from the water.
6.Place all the items removed from the mixture onto the tray.
7. Take the mixture in the beaker and put it on the hot plate. Remember to turn the hot plate on.
8. Wait for the water in the beaker to evaporate. Now, the only thing left in the beaker should be salt that was mixed in with the water.
9. Turn off the hot plate and clean up your lab area.
10. All seven parts of the mixture have been found!
Sunday, December 18, 2011
Frog Dissection

Opening up a frog and looking at its insides is not exactly the most appetizing thing to do before lunch. Last week, in science class, we dissected frogs. At first, I wouldn't even look at the frog. Finally, I mustered up the courage to poke it. After that, I was able to help cut it open and even help point out the organs. My groups frog was a female, so we named her Kermita. On the first day of dissection we only opened up Kermita and observed her organs. Kermita's organs seemed to all be squished in a small space. The first thing I noticed after opening up Kermita was the hundred of tiny, black balls that were everywhere. These were her eggs. I had predicted that her eggs would be enclosed in sac like ovaries in a human body. Instead, the eggs were everywhere.
The next day, my group took out the organs and tried to name them. We noticed that the organs inside the frog were very similar to the organs inside a human body. Kermita had a heart, liver, stomach, lungs, and many other organs also found inside a human body. All of these organs have the same function in a frog as they do in a human. For instance, the liver makes bile in both frogs and humans. A few differences that Kermita had from a human were that she had oviducts, a cloaca, and smaller organs. The oviducts carry and transport eggs. The cloaca is where waste, eggs, and sperm exit the frog. In the end, the frog dissection was a lot of fun and helped teach our class about the organs in a frog.

Online dissection game:
Sunday, December 4, 2011
Tuesday, November 8, 2011
Digestion Lab: Day 2
When we returned to science class today, not much from our lab had changed. In test tube A, the pepsin had crystallized around the egg whites. The pepsin in test tube B had dissolved into the water and made it foggy. Test tube C still had no reaction. Test tube D had the most change. The egg whites had shrunk a little bit and there were bubbles. The materials that were best at breaking down the egg were the hydrochloric acid and pepsin. Alone, the pepsin did not do much to break down the egg white. Hydrochloric acid, alone, also did not do much. Together, they had broken down the egg a little bit. In the end of the lab I concluded that the chemical digestion of protein in food is a slow reaction. This is my conclusion because none of the test tubes had broken down the egg whites.
Digestion Lab: Day 1
Today in science class we began a lab. This lab was about the human digestive system’s way of breaking down food. When doing this lab we used hydrochloric acid, pepsin, boiled egg whites, and water. The hydrochloric acid represented the acid in our stomach that helps break down food. The boiled egg whites represented the food in our stomach. First, we placed egg whites and pepsin in test tube A. After a few minutes the egg whites started turning a light yellow color. Next, we put water, pepsin, and egg whites in test tube B. The water sat at the top while the pepsin sank to the bottom of the test tube. Then, we placed only egg whites and hydrochloric acid in test tube C. There was no immediate reaction in test tube C. In test tube D we put hydrochloric acid, pepsin, and egg whites. The mixture inside the test tube bubbled a little. I predicted that the next day, test tube D would have been the only test tube that had broken down egg whites in it. In the end, we used litmus paper to test the presence of an acid. Litmus paper turns pink when it touches an acid such as hydrochloric acid. Test tubes A and B tested negative for acid, but test tubes C and D tested positive for acid.
Sunday, October 23, 2011
Chicken Wing Anatomy Lab
Last week my science class watched our teacher dissect a chicken wing. We were not allowed to touch this chicken wing because it was raw and could contain some disease. The first layer of the chicken wing was the skin. The skin was a light yellow and look like it had small goose bumps on it. This layer was attached to muscle tissue. Then, our teacher showed us the muscles of the chicken wing. These muscles were pink and looked smooth. These muscles control our movement and they are connected to bone tissue. Tendons are what attach muscles to bone. We also saw fat tissue which was white and connected to muscle tissue. Our teacher pointed out a few ligaments. The ligaments were white and shiny. They were connected to bone tissue and covered joint surfaces. Cartilage was the last tissue we observed. It was white and seemed slippery. The cartilage helps bones move without touching each other and causing damage. During our chicken wing lab we did not find any nerve tissue in the wing. The reason we did this lab was to show how human arms are similar to chicken wings. Human arms are similar to chicken wings is because they also contain ball and socket joints. A difference between them is that our arms have different proportions than chicken wings.
Tuesday, October 11, 2011
Diffusion Lab

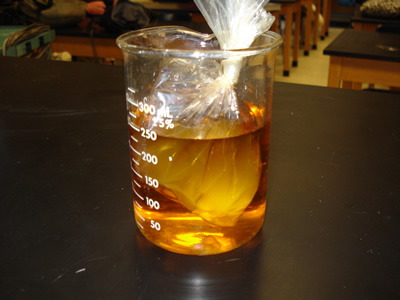
In science class today, we conducted a diffusion lab. Diffusion is the process in which molecules spread from areas of high concentration to areas of low concentration. In this lab we first filled a baggie with a spoon of starch and some water. After tying the baggie, we added iodine to a beaker half-filled with water. Then, we dunked the baggie into the beaker and let it sit for fifteen minutes. After this time the starch and water inside the baggie was supposed to turn purple because iodine is an indicator. This part of the lab was called osmosis, when water molecules move across a selectively permeable membrane. Instead, our baggie was too thick and the water and iodine was unable to pass through it.
Picture: http://www.biologycorner.com/resources/diffusion04.jpg
Sunday, May 22, 2011
Small but Deadly

Usually amphibians are the ones who kill and eat bugs. But this time the bugs are eating the amphibians. These bugs are called Epomis beetles. When this beetle gets an opportunity, it kills and eats amphibians. This beetle doesn't care if the amphibian is many times its size. The beetle still eats it no matter what its size. The diet of this beetle consists of invertebrates, such as worms. When this type of beetle was enclosed with an amphibian, it attacked and consumed it. Amphibians usually feast on insects and most of these insects are beetles. Beetles attacking amphibians brings new insight to the relationship between these two creatures. These beetles eat all types of amphibians including frogs, newts, toads, and salamanders. First, the beetles bites the amphibian in the back. The amphibians then tries to swing the beetle off it's back. The incision made by the beetle into the amphibians back soon paralyzes it. Lastly, the beetle devours the amphibian. Fully devouring the amphibian usually takes the beetle several hours.
I found this article very interesting. It surprised me that these beetles are so small, but still very strong. I never knew that a beetle could be able to eat a whole amphibian. If an Epimos beetle was put in a container with a frog I would guess the frog would eat the beetle. But really the Epimos beetle would be the predator and the frog the prey. It also interested me because of how fast this beetle can kill an amphibian. This shows that no matter how small you are, you can be stronger than someone bigger than you.
This is an interesting video of the Epimos beetle eating a frog:
Source:
Sunday, May 15, 2011
Rutger's Geology Museum
Last week my science teacher assigned our class a project. In this project we were told to build a exhibit for the Rutgers Geology Museum. We had a choice of working by ourselves or in a group. The objective was to create something that visitors of all ages can interact with and enjoy when they visit the museum. My group chose to make an exhibit about rocks and minerals. We didn't want to create something that would be boring and put the visitors to sleep, so we thought of an idea that would be interesting and fun. Our idea consisted of making a sandbox and hiding different rocks in it. On the lid of the sandbox we piled up cards that had a description of each rock in the sandbox. The visitor would have to first pick a card from the pile. Then, they would need to read the description and look at the picture of the rock. Next, they would search the sandbox and try to find the rock using the picture and description on the card. The point of the game was to learn about the physical features of the rocks in the sandbox.
During this project my group faced a few problems. First, we didnt know where to find rocks to put in the sandbox. So, everyone in my group had to search for rocks near their homes. This way, we got a variety of rocks. Also, no one in my group knew where to get sand from. Then, my mom gave us the idea of using sand from sand art. At home I had about six bottles of sand art. We used this colorful sand to fill up our sandbox. In the end, our project was a success and my group really enjoyed making an exhibit for the Rutgers Geology Museum. We hope that the museum will enjoy our project as much as we did.
During this project my group faced a few problems. First, we didnt know where to find rocks to put in the sandbox. So, everyone in my group had to search for rocks near their homes. This way, we got a variety of rocks. Also, no one in my group knew where to get sand from. Then, my mom gave us the idea of using sand from sand art. At home I had about six bottles of sand art. We used this colorful sand to fill up our sandbox. In the end, our project was a success and my group really enjoyed making an exhibit for the Rutgers Geology Museum. We hope that the museum will enjoy our project as much as we did.
Sunday, January 30, 2011
Turtles in Danger

After the BP oil spill, more sea turtles, in the Gulf of Mexico, were killed and injured than before the oil spill. Almost 600 turtles were hurt because of the polluted water. This could also have been caused because of the chilly weather and other causes. A report says that the death rate was four to six times above average. These turtles suffered more than any species because their population is already very low and it takes many years for the turtles to reach adulthood. This means it will take many years to restore their population to how it was before the damage.
I found this article about these suffering turtles interesting. First, it shows how everyone needs to help endangered animals stay safe. If this doesn't happen more and more animals will be in danger because their food chains would be damaged. Also, if we do not help them they will become extinct. Many people have already taken their part in helping all the animals affected by the BP oil spill, and it is now our turn to help.
Sources:
Wednesday, January 12, 2011
NASA's discovery

This article interested me because it shows how our planet has gotten so far over these years. We will still progress each and every year and learn new things about our planet. These new things we learn each year will help us advance in many different subjects such as technology.
Sources:
http://www.time.com/time/health/article/0,8599,2041683,00.html
http://kepler.nasa.gov/news/index.cfm?FuseAction=ShowNews&NewsID=94
Picture:
http://img.timeinc.net/time/daily/2011/1101/kepler_10b_0110.jpg
Subscribe to:
Posts (Atom)